SAML2 (WAYF, Shibboleth, ADFS)
Looking for SAML2 configuration in Pure 5.30 or later? Then please use this link Configuring SAML2 (Pure 5.30 and later)
Shibboleth is a 'single-sign in', or logging-in system that allows people to sign in, using just one 'identity', to various systems run by' federations' of different organisations or institutions. It uses SAML as the underlying protocol. Identity providers (IdPs) supply user information, while service providers (SPs) consume this information and give access to secure content.
Example federations:
- WAYF (Denmark)
- InCommon (USA)
- Haka (Finland)
- SURFfederatie (Netherlands)
- UK Access Management Federation for Education and Research (UK)
- Pure can be configured to interface with identity providers with the SAML2 protocol.
The protocol requires signing and supports encryption of communication. In that connection a private key and a certificate is needed. For Pure a self-signed certificate will do. Some institutions may require an certificate to be issued by a trusted authority.
The process of configuring Pure to use use Shibboleth / SAML2 authentication is as follows:
Required configuration steps
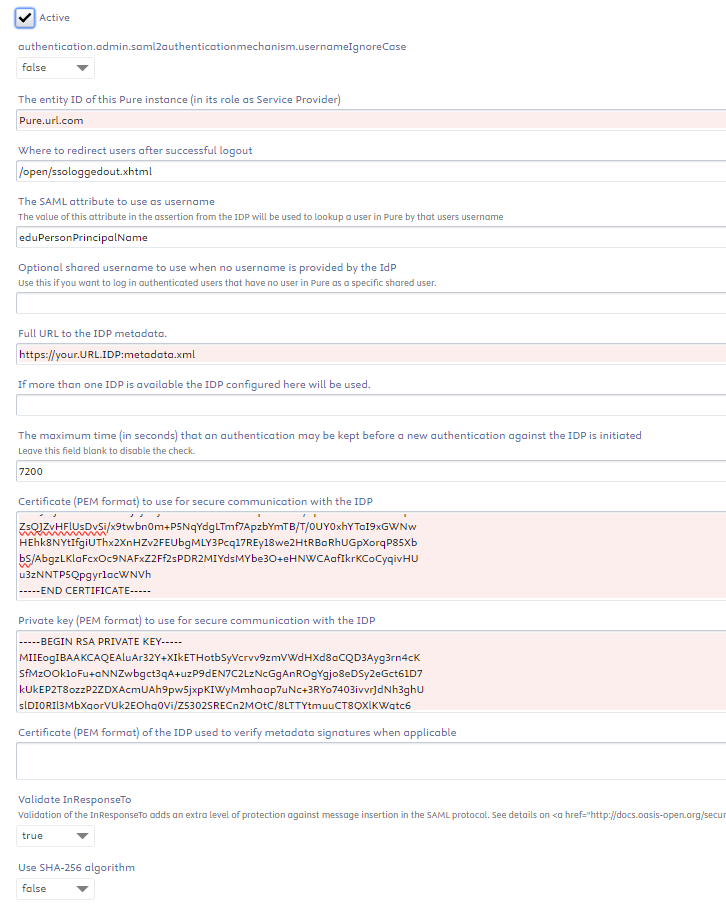
1. Enter the Full URL to the IDP metadata.
2. Enter the The entity ID of this Pure instance (in its role as Service Provider)
3. The SAML attribute needs to be the same value that is used in pure as “username” on users.
This often works better when configured as the full path eg. "http://schemas.xmlsoap.org/ws/2005/05/identity/claims/name"
4. Enter Certificate (PEM format) to use for secure communication with the IDP
5. Enter Private key (PEM format) to use for secure communication with the IDP.
Note that the private key must be in RSA format, which is the case in the example commands below.
See details below:
Optional configuration
![]() Enter the SSL certificate of the IDP webserver to enable trust
Enter the SSL certificate of the IDP webserver to enable trust
![]() Disable Validate InResponseTo in some rare circumstances the extra validation of InResponseTo can be disabled
Disable Validate InResponseTo in some rare circumstances the extra validation of InResponseTo can be disabled
![]() Configure The maximum time that an authentication may be kept before a new authentication against the IDP is initiated
Configure The maximum time that an authentication may be kept before a new authentication against the IDP is initiated
![]() If more than one IDP is contained in the IDP metadata (federation) the specific IDP to use can be entered in If more than one IDP is available the IDP configured here will be used.
If more than one IDP is contained in the IDP metadata (federation) the specific IDP to use can be entered in If more than one IDP is available the IDP configured here will be used.
Further details
1. Obtain/generate a key and certificate to use for encryption and/or signing. (See the openssl examples below)
2. Activate and configure the mechanism i Administrator> security
Enter an entity id for this Service Provider and enter the URL to the Identity Provider metadata, key and certificate
3. Go to https://<your hostname>/admin/saml2/service-provider-metadata/pure to download the metadata for this Pure instance (configure the certificates before this will appear). Note that the authentication mechanism must be set to "active" in order to be able to download the metadata.
NOTE; before version 5.30 the URL for the metadata was: https://<your hostname>/admin/saml/metadata
4. Register this metadata with the Identity Provider / Federation and make sure that the eduPersonPrincipal Name (or other similar) attribute is included in the authentication responses from the Identity Provider.
Example of creating a key and self-signed certificate
Check related article Generating SAML Certificates and Private Keys.
These commands creates unencrypted files containing the private key and certificate in PEM format, which can be used in the Pure configuration.
| openssl examples |
|---|
|
The default format of keys was changed in OpenSSL 1.0: The default is now PKCS8 format. Pure needs the PKCS1 format. You can convert the PKCS8 file (first line is -----BEGIN PRIVATE KEY-----) to PKCS1 (first line is -----BEGIN RSA PRIVATE KEY-----) with :
openssl rsa -in key1.pem -out key2.pem
Notes specific for ADFS
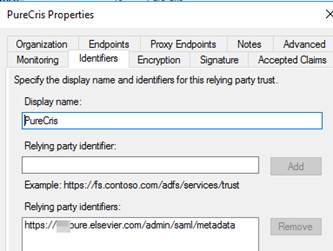
Configuration of relaying pary
In ADFS new relaying party was created and metadata imported from https://xxx.pure.elsevier.com/admin/saml/metadata
When choosing the encryption algorithm to use the client should choose SHA1.
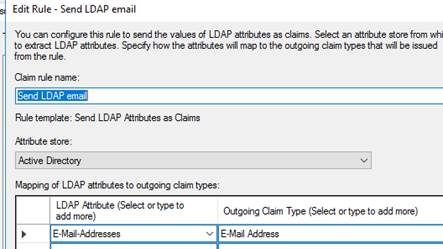
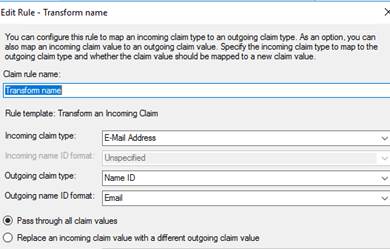
And two rules added:
1) LDAP rule
2) Transform Rule
Changing Certificates and download new metadata
1. Restart of the SAML2 authentication mechanism (disable enable) in Pure or a complete Pure restart will load the new metadata and certificate.
2. You may need to add a new certificate to the "Certificate (PEM format) field of the IDP used to verify metadata signatures in Pure in the SAML2 Configuration (see above) if applicable to configuration field so that metadata can be reloaded automatically.
Azure
The MaxInactive Time in Azure is 90 days, while the default timeout in Pure is 2 hours, this can cause problems because Azure then sends a token that is too old compared to what Pure expects, and therefore user login will fail.
The timeout in Pure can be increased under the SAML settings
![]()
NOTE: Currently Pure cannot support more than 24 days. (for Pure 5.19.1 and onwards this limit has been removed and should support at least the default 90 days used in Azure)
This article describes how to configure tokens in Azure, Refresh Token Max InactiveTime must be set to the same as the timeout set in Pure. https://docs.microsoft.com/en-us/azure/active-directory/develop/active-directory-configurable-token-lifetimes
On Pure versions higher than 5.19.1 you should use 7776000 as the timeout value to match the 90 days in Azure We have also enabled the option to leave the field blank which can help set this up on some systems like Azure.
Attribute Note: Using Azure, the SAML Attribute must include the fully qualified URL for the attribute for successful authentication.
Google Authentication
For Google Authentication details click here.
How to perform a SAML-trace
How to perform a SAML-trace